Modular Programming in Java

Hello readers, in this article we will learn about the Java 9 Module System also known as the “Jigsaw Project”.
We are going to discuss the difficulties before Java 9, how those problems gave rise to the thought about the Jigsaw project, and lastly how it helped the developers around the world to overcome the challenges before Java 9.
As we all know that Oracle, with every Java version release, always brings us a major reason to keep loving Java which also helps in maintaining a solid position of Java in the league of leading and most loving programming languages around the world. This time Java has come up with a revolutionary feature called Java Module System or the Jigsaw Project.
Let’s start our topic by exploring more on the Jigsaw project, why was it needed and how did it help.
The Jigsaw Project
The Jigsaw project introduced the Java module system to the world of Java Programming. The name comes from the thought or concept of abstracting the packages into a bigger unit called ‘Modules’. Modules conceptually play the role of pieces in a Jigsaw puzzle thus creating a wholesome picture when used in different combinations.
Let’s get on to the questions – What, Why and How do we use Java Module System.
What is Modular programming?
Modular programming is a technique of software programming that accentuates breaking down monolithic programs into modular portions which can be used interchangeably where every module contains all that is needed for one complete functionality.

The foremost purpose of modular programming is to decompose large software programs into smaller units called Modules.
Modular programming brings forth the concept of modules and an interface for each module. This interface is usually a configuration file or metadata that describes the requirements for a module and the features that it provides.
What is a module?
A module is a group of reusable related packages, its resources, and a descriptor. Packages include types like class files, interfaces, etc and resources include static data like XML and images and consider the descriptor as metadata which describes various aspects of the module.
Every module’s descriptor specifies –
- Name of the module
- Dependencies of the module
- Public packages within the package that is available to other modules
- Services it offers
- Services it can consume
- Reflection permissions which state other modules that are allowed to use reflection on the current module
We will discuss the sections of a module descriptor in detail, later in this article.
Why is Java Module System needed?
The Java Module System brings us many benefits and below are the few principal benefits.
Encapsulation of Packages for better security
As we read about it earlier in this article, every module has a descriptor. A programmer can expose a few packages to other modules while encapsulating other packages. This configuration can be done using the module descriptor. The feature of the descriptor provides us an option to configure the security of internal Java packages. This feature to encapsulate internal packages from each other was absent from Java programming language before the Module System was introduced.
Modular Deliverable
Over a long period of time, there has been a growth in the number of Java APIs. Before Java 9 all these packages of APIs would be included in your project even if your project wasn’t using it, thus making the Java deliverable packages heavier.
The Module System in Java 9 categorize these Java APIs into smaller units called Modules. This enables the programmers to specify only the modules which are required for the application. Java reads this specification and packages the application with only the modules that are specified by the programmer.
Reduced runtime exceptions due to missing classes
Before Java 9 many classes were loaded and used during runtime and not during the start-up of the application. One such example is Jersey 2.0, which does not come with JSON support and thus fails during runtime while processing data in a JSON format.
With the introduction of the Module System, all the required modules would be checked during the start-up of the application. Each module will specify other required modules in the descriptor and JVM will check for the complete dependency graph for the availability of all required modules. This will ensure that the exception due to missing modules or packages is thrown at the start-up of the application rather at runtime. Resolving start-up issues are much simpler to debug than the runtime exceptions.
How do we use the Module System?
Let’s start with looking into the modules provided by Java language. To find the list of all Java modules, use the below command either on command prompt or PowerShell for windows –
java --list-modules
The output of this command, for Java version 9.0.4, is a list of 98 modules. Below are those 98 modules which are included in Java version 9.0.4 –
| java.activation | java.xml.crypto | jdk.internal.ed |
| java.base | java.xml.ws | jdk.internal.jvmstat |
| java.compiler | java.xml.ws.annotation | jdk.internal.le |
| java.corba | javafx.base | jdk.internal.opt |
| java.datatransfer | javafx.controls | jdk.internal.vm.ci |
| java.desktop | javafx.deploy | jdk.jartool |
| java.instrument | javafx.fxml | jdk.javadoc |
| java.jnlp | javafx.graphics | jdk.javaws |
| java.logging | javafx.media | jdk.jcmd |
| java.management | javafx.swing | jdk.jconsole |
| java.management.rmi | javafx.web | jdk.jdeps |
| java.naming | jdk.accessibility | jdk.jdi |
| java.prefs | jdk.attach | jdk.jdwp.agent |
| java.rmi | jdk.charsets | jdk.jfr |
| java.scripting | jdk.compiler | jdk.jlink |
| java.se | jdk.crypto.cryptoki | jdk.jshell |
| java.se.ee | jdk.crypto.ec | jdk.jsobject |
| java.security.jgss | jdk.crypto.mscapi | jdk.jstatd |
| java.security.sasl | jdk.deploy | jdk.localedata |
| java.smartcardio | jdk.deploy.controlpanel | jdk.management |
| java.sql | jdk.dynalink | jdk.sctp |
| java.sql.rowset | jdk.editpad | jdk.rmic |
| java.transaction | jdk.hotspot.agent | jdk.plugin |
| java.xml | jdk.httpserver | jdk.snmp |
| java.xml.bind | jdk.incubator.httpclient | jdk.naming.dns |
| jdk.naming.rmi | jdk.policytool | jdk.unsupported |
| jdk.net | jdk.management.cmm | jdk.xml.bind |
| jdk.pack | jdk.scripting.nashorn | jdk.xml.dom |
| jdk.packager | jdk.scripting.nashorn.shell | jdk.xml.ws |
| jdk.packager.services | jdk.management.agent | jdk.zipfs |
| jdk.management.jfr | jdk.security.auth | oracle.desktop |
| jdk.plugin.dom | jdk.security.jgss | oracle.net |
| jdk.plugin.server | jdk.management.resource |
We will briefly explore a module among the Java-provided modules. The name of the module is java.se and it defines the core Java SE API.
A complete list of all the internal packages both exported and private can be found here.
Below is a module graph of java.se

java.se module is an aggregator module, it references all the modules making up the core Java SE API. It is called an aggregator module as it contains just the module-info.java class and no other code of its own. It only implies readability and contains all the requires transitive of all the dependencies.
Suppose a programmer needs the features of Java SE in the application, so instead of including all these modules, only java.se module can be included. As shown in the image, java.se module references many dependencies including java.sql.rowset, java.xml.crypto, java.scripting, java.management.rmi, etc.
To get the complete list of Indirect Exports packages and Requires modules can be found here
Creating a new module
Now, let’s create our very own module with the simplest Hello World! application.
A plain Java class to print Hello World! is shown below:
package me.janeve.module;

public class HelloWorld {
  public static void main(String args[]) {
    System.out.println("Hello World! Welcome to the Modular world of Java 9");
  }
}
To make it a module, a module descriptor named module-info.java must be added at the root location of the source folder. Here is the module descriptor for our Hello World application –
module module_hello_world {
  /*
   * This module exposes the only package that we have in our application.
   */
  exports me.janeve.module;
}
One way to create a module descriptor for an application using an IDE (STS 3.9.12 in my case) is shown below –
- Right-click on the Java project which needs to be created as a module.
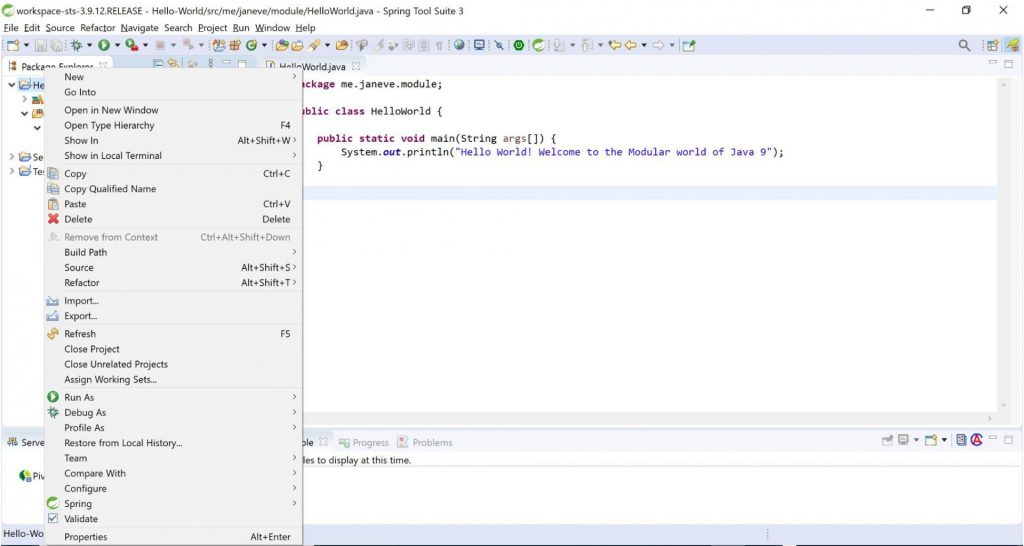
- Navigate to the Configure option in the menu that appears by the right-click.
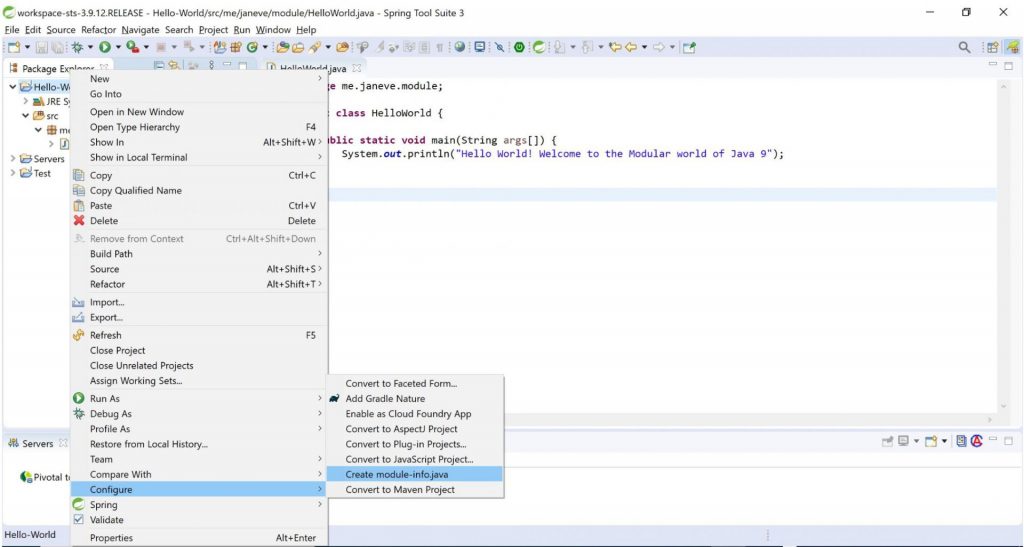
- Select the option ‘Create module-info.java’.
- Give your module a name that appropriately describes your module (We coined ‘module_hello_world’ as the name for our Hello-World application.
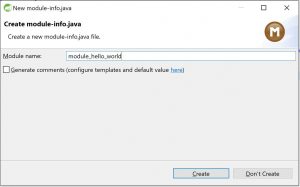
Voila! Our Hello-World application has now become a modular application.
The steps above will also create a module-info.java for the application with the export statement for the application already added to it, also shown above. This module descriptor can be altered as per the application’s need.
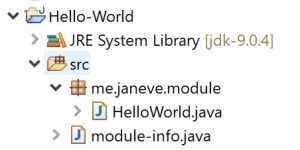
Here is how the project folder structure would look like for a bare-minimum Java 9 module.
Module Declarations
The module descriptor file contains a list of statements that are called the “Module Declaration”. A module declaration can have multiple keywords inside its body including requires, requires transitive, exports, exports…to, etc. These keywords are called “Module Directives”. These directives are restricted keywords that are only restricted as keywords inside a module descriptor and can be used as identifiers elsewhere.
Below is the list of module directives with a brief explanation.
requires
This module directive specifies the names of other modules on which the current module is dependent upon. Every module has to specify all other modules which it depends on.
Syntax:
requires <module_name>;
requires transitive
This module directive ensures that another module reading this module also reads its requires transitive dependency. It is also known as implied readability.
Syntax:
requires transitive <module_name>;
exports
This module directive specifies one package from all the module packages. The public types and all their nested public and protected from this package will be accessible to the code in all other modules.
Syntax:
exports <package_name>;
exports…to (qualified export)
This module directive provides a way to mention all the modules and module’s code which can access the exported package. More than one module names can be provided in a list. separated by a comma.
Syntax:
exports <package_name> to <module_name_1>, <module_name_2>;
uses
This module directive specifies the name of a generic type (an interface or an abstract class). This generic type represents a service that this module uses, thus making this module a service consumer. A service is an object which either implements the specified interface or extends the abstract class.
Syntax:
uses <interface_or_abstract_class_name>;
provides…with
This module directive specifies that the module provides a service implementation thus making it a service provider. The provides part mentions the name of the abstract class or the interface, whereas the with part mentions the name of the service provider class which either implements the interface or extends the abstract class.
Syntax:
provides <interface_or_abstract_class_name> with <service_provider_class_name>;
open
If all packages inside a module has to be made available to all other modules during runtime and via reflection then the module can be set as open.
Syntax:
open module <module_name> {

      ...module directives;

}
opens
This directive is used to make a specific package’s public types, along with its nested public and protected members, accessible to all other modules at runtime. It also makes all the types inside the specified packages and all types of its members accessible via reflection.
Syntax:
opens <package_name>;
opens…to
This module directive can be used to make public types, along with its nested public and protected members, accessible to the modules mentioned in the comma separated list. All types inside the package, along with all of types of its members , are accessible via reflection.
Syntax:
opens <package_name> to <module_name_1>, <module_name_2>;


